PVC Toilet Tank Liner Review: Cut-to-Fit Insulation for Reducing Condensation
Condensation on the outside of a toilet tank can leave more than a few harmless droplets. In humid bathrooms, repeated tank sweating may create damp flooring, slippery surfaces, water stains, and long-term moisture around the base of the toilet.
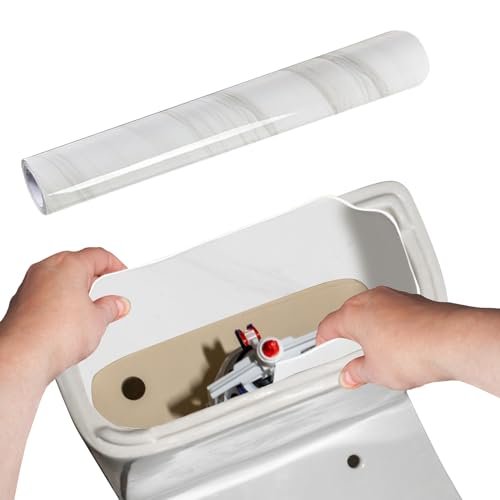
This cut-to-fit PVC toilet tank liner is designed to reduce that problem by adding an insulating layer inside the tank. The roll measures approximately 15.7 inches wide and 118 inches long, providing enough material for one large tank or potentially several smaller installation sections, depending on the toilet’s dimensions and the amount of coverage required.
With a self-adhesive backing and flexible construction, the liner offers a relatively straightforward DIY option for bathrooms affected by cold supply water, high humidity, or frequent toilet use.
What Is a Toilet Tank Liner?
A toilet tank liner is an insulating material applied to the inside walls of a toilet cistern. Its purpose is to reduce the transfer of cold from the stored water to the porcelain tank.
Without insulation, cold water can lower the temperature of the tank’s exterior surface. When warm, humid bathroom air touches that cold porcelain, moisture may condense into droplets.
The liner creates a barrier between the water and the tank wall, helping the exterior remain closer to the surrounding room temperature.
Why Toilet Tanks Develop Condensation
Toilet condensation is especially common when cold incoming water combines with warm, moisture-rich air.
Several factors can make the problem worse:
- High indoor humidity
- Poor bathroom ventilation
- Cold well water
- Frequent toilet flushing
- Warm summer weather
- Long showers or baths
- A constantly running toilet
- Air-conditioned rooms near warmer bathrooms
Each flush introduces fresh cold water into the tank. In a busy household, the porcelain may remain cool for much of the day, allowing condensation to reform repeatedly.
Why Tank Sweating Can Become a Problem
A sweating toilet tank can gradually release water onto nearby surfaces.
Repeated moisture may contribute to:
- Slippery bathroom floors
- Damaged laminate or wood flooring
- Stained grout
- Damp baseboards
- Musty odors
- Moisture around the toilet base
- Confusion with an actual plumbing leak
A liner can help reduce condensation, but it is important to confirm that the water is not coming from a leaking valve, fitting, gasket, or seal.
Long 15.7 x 118-Inch Roll
The liner roll measures approximately:
- 15.7 inches wide
- 118 inches long
The long format gives users flexibility when covering tanks with different shapes and internal dimensions.
Instead of relying on one pre-cut piece, the roll can be divided into separate sections for:
- Front tank wall
- Rear wall
- Side walls
- Curved corners where practical
- Additional small areas left exposed
The amount required depends on the tank’s size, shape, and internal hardware. Measure carefully before cutting.
PVC Material
The liner is made from PVC, a flexible synthetic material commonly used where moisture resistance and durability are needed.
PVC can be practical inside a toilet tank because it is designed to tolerate a wet environment. Its flexibility also makes it easier to trim around tank hardware and curved surfaces.
The material is described as strong and stable, but long-term performance will still depend on:
- Adhesive quality
- Surface preparation
- Water chemistry
- Tank shape
- Installation accuracy
- Repeated filling and draining
The liner should be inspected periodically for peeling, bubbles, or deterioration.
Self-Adhesive Backing
The built-in adhesive backing simplifies installation because separate glue is generally unnecessary.
After the tank has been cleaned, dried, and measured, the protective backing is removed and the liner is pressed onto the interior porcelain.
A self-adhesive design can save time, but the bond will only be reliable if the tank wall is completely clean and dry. Moisture, mineral scale, residue, or dust may cause the material to lift after the tank is refilled.
How the Liner Helps Reduce Condensation
The liner reduces direct contact between cold water and the porcelain wall.
By slowing heat transfer, it may help keep the outside of the tank warmer. A warmer exterior surface is less likely to reach the dew point at which airborne moisture becomes liquid.
Effectiveness depends on:
- Bathroom humidity
- Incoming water temperature
- Liner thickness
- Amount of surface covered
- Adhesion quality
- Frequency of flushing
- Ventilation
In very humid environments, the product may reduce tank sweating without eliminating every trace of moisture.
Suitable for Homes with Well Water
Homes supplied by wells may receive especially cold water, making toilet condensation more noticeable.
When the tank refills with cold groundwater, the porcelain surface can cool quickly. In a warm bathroom, that temperature difference creates favorable conditions for condensation.
A tank liner may be particularly useful in:
- Rural homes
- Basements
- Humid climates
- Poorly ventilated bathrooms
- Frequently used family bathrooms
- Seasonal properties with temperature swings
Preparing the Toilet Tank
Surface preparation is the most important part of the installation.
Turn Off the Water Supply
Close the shutoff valve near the toilet.
Drain the Tank
Flush the toilet and hold the handle down to remove as much water as possible.
Remove Remaining Water
Use a sponge, towel, or wet vacuum to empty the bottom of the tank.
Clean the Porcelain
Remove dirt, scale, mineral deposits, and residue from all surfaces where the liner will be applied.
Dry the Tank Completely
The porcelain must be fully dry. Even a thin film of moisture can reduce adhesive strength.
Allow the tank to air-dry, or use a dry cloth to remove remaining moisture. Avoid unsafe use of electrical appliances near water.
Measuring the Interior
Measure each wall separately rather than assuming the tank is a perfect rectangle.
Important measurements include:
- Internal length
- Internal width
- Wall height
- Curved corners
- Bolt locations
- Fill-valve clearance
- Flush-valve clearance
- Overflow tube position
Creating paper templates before cutting the PVC can reduce waste and improve fit.
Cutting the Liner
Use sharp scissors or a utility knife on a protected work surface.
Separate sections are often easier to install than one large continuous piece. Smaller panels can fit around hardware more accurately and are less likely to trap large air bubbles.
Leave enough clearance around:
- Flapper
- Chain
- Flush lever
- Float
- Fill valve
- Overflow tube
- Tank bolts
- Water outlets
The liner must not interfere with any moving part.
Applying the Liner
Peel away only part of the backing at first.
Align the upper edge of the section, then press the liner gradually onto the porcelain while removing more backing. Work from the center outward to push away air and reduce wrinkles.
Press firmly around corners and edges. Avoid stretching the PVC, as stretched material may pull back or lift after installation.
Where sections meet, position the seams carefully to limit exposed porcelain.
Refilling and Testing
After the liner is installed:
- Inspect every section for loose edges.
- Confirm that all toilet components move freely.
- Open the water valve slowly.
- Watch the liner as the tank fills.
- Check for lifting or trapped air.
- Flush several times.
- Confirm that the flapper seals.
- Verify that the float operates normally.
- Check the exterior over the next several hours.
Follow any manufacturer guidance regarding adhesive curing time before refilling.
Distinguishing Condensation from a Leak
A liner will not solve a plumbing leak.
Before installation, inspect common leak points such as:
- Supply hose
- Shutoff valve
- Fill-valve connection
- Tank bolts
- Flush-valve seal
- Tank-to-bowl gasket
- Wax ring
Condensation usually appears across a broad area of the tank exterior. A leak often starts from a specific fitting, bolt, or seam.
Dry the toilet completely, then observe where the first new moisture appears.
Additional Ways to Reduce Toilet Condensation
Improve Ventilation
Run the bathroom exhaust fan during showers and afterward. Confirm that it vents outdoors.
Reduce Indoor Humidity
A dehumidifier may help in persistently damp bathrooms or basements.
Repair a Running Toilet
A toilet that continuously refills keeps introducing cold water and may worsen sweating.
Increase Air Circulation
Leaving the door open after bathing can help humid air escape.
Consider an Anti-Sweat Valve
A plumber may install a mixing valve that introduces a small amount of warm water into the toilet supply. This is a more complex option for severe cases.
Common Installation Mistakes
Applying the Liner to a Damp Surface
Adhesive may fail quickly if the porcelain is not completely dry.
Skipping Mineral Removal
Scale creates an uneven surface and prevents reliable bonding.
Cutting Without a Template
Incorrect measurements can waste material and leave important areas uncovered.
Covering Moving Components
The liner must not obstruct the float, flapper, chain, or valves.
Stretching the Material
Excess tension can cause the liner to peel away later.
Leaving Large Gaps
Uncovered porcelain may remain cold and continue producing condensation.
Assuming Condensation Is the Only Issue
Always rule out plumbing leaks before installing insulation.
Maintenance and Inspection
A toilet tank liner should be checked periodically.
Look for:
- Peeling edges
- Bubbles
- Detached sections
- Material deterioration
- Interference with moving parts
- Debris trapped behind the liner
- Continuing exterior condensation
If a section separates, the tank may need to be drained and dried before repair or replacement.
Advantages and Considerations
Advantages
- Large 15.7 x 118-inch roll
- Cut-to-fit format
- Flexible PVC construction
- Self-adhesive backing
- Can cover multiple tank sections
- Helps reduce toilet tank condensation
- May protect floors from repeated dripping
- Suitable for many standard toilet tanks
- Useful in homes with cold well water
- Requires no electrical power or plumbing modification
Potential Considerations
Installation requires careful cleaning, complete drying, accurate cutting, and patient application.
The liner cannot repair a leaking toilet and may not eliminate condensation in extremely humid bathrooms. Compatibility also depends on the shape of the tank and available clearance around the internal mechanism.
The source does not provide a verified insulation rating or exact thickness, so performance should be evaluated based on actual conditions.
Frequently Asked Questions
What size is the liner?
The roll measures approximately 15.7 inches wide and 118 inches long.
What material is it made from?
It is described as PVC.
Is the liner self-adhesive?
Yes. It includes an adhesive backing for direct application to the tank interior.
Can it be cut?
Yes. The roll is intended to be trimmed to fit different toilet tank shapes.
Does it stop toilet condensation completely?
It may reduce condensation significantly, but results vary with humidity, water temperature, ventilation, and installation quality.
Can it repair a leaking toilet?
No. It is designed for condensation control, not plumbing repair.
Does the tank need to be empty?
Yes. The water must be shut off, the tank drained, and the interior fully dried.
Can it be applied over mineral deposits?
No. Scale and residue should be removed first to improve adhesion.
Will it fit every toilet?
No. Some compact, pressure-assisted, or unusually shaped tanks may not provide enough space or suitable surfaces.
Can it interfere with flushing?
Yes, if installed too close to moving components. Keep all mechanisms clear.
Is one roll enough for several toilets?
Possibly, depending on tank size and the amount of material required. Measure each tank before planning multiple installations.
Why is moisture still forming after installation?
Possible causes include high humidity, incomplete coverage, poor adhesion, a running toilet, extremely cold water, or an actual leak.
Final Thoughts
This 15.7 x 118-inch PVC toilet tank liner provides a flexible DIY option for reducing toilet condensation in humid bathrooms and homes with cold supply water.
Its long roll format allows users to cut individual sections for the front, back, and sides of the tank, while the self-adhesive backing removes the need for separate glue. When installed on clean, completely dry porcelain, the liner can help reduce the temperature difference that causes the tank exterior to sweat.
The quality of the installation is critical. Accurate measuring, careful cutting, complete surface preparation, and sufficient clearance around the toilet mechanism all affect the result.
For bathrooms where moisture has been confirmed as condensation rather than a plumbing leak, this cut-to-fit liner can be a practical way to keep the tank exterior and surrounding floor drier.